How does an equalizer work?
What will we cover in this tutorial:
– Filters
– Shelving equalizers
– Graphic equalizers
– Parametric and sweepable equalizers
– How to EQ
There are various types of EQ’s. We’ll have a look at them and explain how to work with them in this tutorial. Let’s start with a video.
An equalizer is basically just a volume knob, but one that only works on a specific frequency. You can use it to boost frequencies you want to hear and cut frequencies you don’t want to hear.
Personally, I think an EQ is one of the most versatile mix-tools. Because with an EQ you can give everything its ‘own place’ in the stereo field.
As mentioned before, I always try to mix in ‘3D’. So for example I try to make it sound like the singer is right in front of you and the band is playing just behind that singer.
An EQ helps a great deal to achieve that effect. Because one of the ‘hints’ for our brain to determine whether something is close to us or far away is the amount of mid and high frequencies we hear. So if you want something to sound a little more up-front in the mix, you can add some mids and highs (and turn up the volume of that track a bit). Or you can turn those frequencies down (and lower the volume) if you want something to sound like it is a little more in the back.
So in the video we use a parametric EQ. But that’s not the only type of EQ there is. Let’s have a look at some of the other flavours!
Filters
A filter is the simplest type of equalizer. It removes everything below or above a certain frequency. For example everything below 80Hz. This is called a low-cut filter. You can also remove everything above a certain frequency, for example everything above 10 kHz. This is called a high-cut filter. To make things a bit more confusing, the terms high-pass (= low-cut) and low-pass (=hi-cut) are also used.
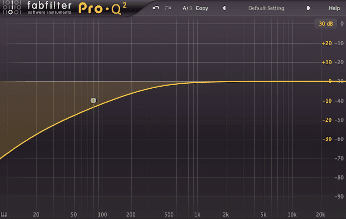
Using a filter is easy: you simply specify the frequency from which the filter should do its work. Say filter out everything below 80 Hz. And that’s it!
Small thing to keep in mind: the filter works gradually. So as you can see in the picture above, the attenuation starts a little above 80Hz and slowly gets more and more.
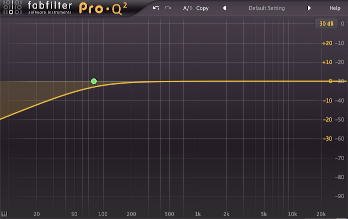
How gradually the filter works, is called the slope. The steepness of the slope is expressed in dB per octave. So a slope of 6dB/octave looks like this:
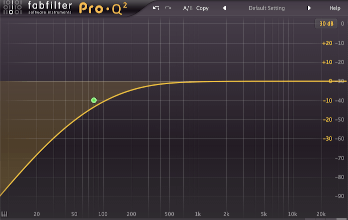
And a slope of 18dB/octave like this:
Shelving equalizers
You have to use your imagination for this, but there have been some some people in the past who looked at the curve of a shelving EQ and said: ‘Wow, that thing looks exactly like a shelf!’
Judge for yourself:
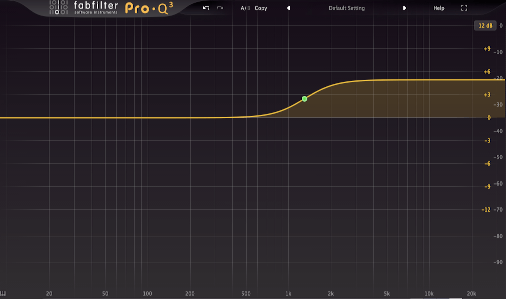
With a shelving EQ you can make all frequencies above a selected frequency louder or softer. There are 2 types: High shelves and low shelves. A high shelve amplifies / attenuates everything above a certain frequency, a low shelve everything below that frequency.
How much you amplify or attenuate is something you can usually define yourself. Often it is max. 12 dB or 18dB. And on most shelving EQ’s you can also choose the frequency from which you want to amplify or attenuate. On some this is a fixed frequency.
Graphic equalizers
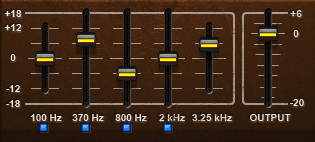
A graphic equalizer works with a row of vertical sliders. Each slider can boost or attenuate a certain frequency band. The more sliders you have, the smaller the frequency band per slider you can edit.
If you look at a graphical EQ, you can immediately see which frequencies are amplified or attenuated, hence the name ‘graphic EQ’:
Parametric and sweepable equalizers
With a parametric EQ you have the most control over everything. This type is used most by audio engineers. How does it work? We’ll start with the sweepable EQ, which is actually a simplified version of a parametric EQ.
There are 2 basic controls: a control to turn frequencies up or down and another to choose which frequencies exactly. You simply ‘sweep’ through the frequency spectrum, select the frequency you are looking for and you amplify or attenuate that.
Example: let’s say you hear too much bass in a recording. To fix this, you select a random frequency and boost this. Next you sweep trough the low frequencies. This way you can find exactly the frequency you are looking for and attenuate it.
So why boost first if you want to cut it in the end? Because our ears are more sensitive to that. It makes it easier to find the problem area’s.
In reality you never amplify or attenuate only 1 frequency with a sweepable EQ. It is always a wider group of frequencies. And the more you amplify or attenuate, the wider this frequency range becomes.
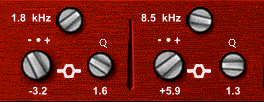
And this is exactly the difference between a sweepable and a parametric EQ. With the latter you have a third control: the Q-factor. See image above. With that you determine how wide the frequency range is you want to boost or attenuate.
How to EQ
Ok, so how do you make the sound of a recording better with an EQ?
Maybe you hear a ‘boxy’ sound in a recording. Or a very harsh sound you want to attenuate a little. To find that specific frequency it, it’s best to first boost any frequency, say with 10 dB and with a fairly narrow Q-factor of 3. Now you just turn the frequency knob and sweep through the entire frequency spectrum until you find the frequency you were looking for. Then you attenuate it a little. Why amplify first? Well, our ears are just more sensitive to that, so it makes the process a little easier.
When you think you have found the perfect EQ setting, do a reality check: turn off the EQ. Has it really gotten much better? This can sometimes lead to situations where it turns out to be best to start all over again. That way you’ll probably get a better result with fewer adjustments.
Keep in mind that when comparing two recordings, the loudest often sounds better to your ears. This has to do with the way our ears work. So if you do an A-B test, make sure you correct for level differences to get a level playing field.
Questions or comments? Let me know via gijs@audiokickstart.com!

