Video editors: the best settings for exporting audio
(OMF file or separate audio files)
What will we cover in this tutorial:
– Separate audio files or OMF?
– Creating OMF files
– Importing OMF files into your DAW

Separate audio files or OMF?
If you want to edit or mix audio for a video production, step 1 is exporting the audio from your video editing software so you can import it into your DAW (audio editing software). There are a few ways to do this. Which one you choose mainly depends on how many audio tracks you have in your session.
Only a few audio tracks?
If you only have 1 or 2 audio tracks (e.g. just a voice-over and music) it is often easiest to export them one by one as separate audio files. Make a selection that’s exactly the same length as the video. Put the track you want to export in ‘solo’, and export it. This is often done via File – Export (depending on your video editing software). Do this one by one for all audio tracks.
Don’t know what settings to use when exporting the audio? See Audio formats – Which one should I use. You then import the exported audio files into the audio editor. Put them both on their own audio track, import the video track into your DAW and you can start mixing. Most audio editors can handle a small MP4 with H264 codec by the way.
More audio tracks?
If you have many audio tracks, there is an easier option to export everything at once: as an OMF (Open Media Framework). This is a format in which all separate audio tracks are exported into one large file. That file can be opened in almost all DAW’s. And when imported, you will see all the separate audio tracks back. On the right place in the timeline, exactly where you had put them during video editing.
Let’s have a look at creating an OMF file.
Creating OMF files
How you create an OMF depends on the software you use. In Adobe Premiere you can do it via File – Export – OMF. When exporting you will come across a number of options. Below we will discuss the options you will find in Premiere. This is similar to the options you see in most other video editing software.
- Encapsulate
If you check this option, all audio tracks plus all information about those tracks (e.g. the exact location of the audio files in the timeline) will be written into one big file. This option is often preferred. - Separate Audio
If you select this option, an OMF file will be created containing all meta data (e.g. information about the location of the audio in the timeline, the level, etc), but the audio itself will be stored in a separate folder. So you will need your OMF file plus that folder with audio files if you want to import it into a DAW later on. - Copy Complete Audio Files
Giving an example makes explaining this one easy: If you have music in your video, you may have cut away the beginning and end of the track to make it fit. But obviously, with a few mouse clicks you can still retrieve the entire music track should you want to. If you select “Copy Complete Audio Files”, you will also have this option in the OMF file. - Trim Audio Files
If you choose Trim Audio Files, then the beginning and end of the music are gone forever in the OMF. The up-side: the size of the OMF file is a lot smaller. The down side: You can’t edit the music anymore and you are stuck with the way it was edited in the video editing software. - Handle Frames
Luckily there is a third option that is somewhere in between: Handle Frames. This option determines how many frames remain available in the OMF before and after your edited music track. I would recommend to use 3 or 4 seconds. In Premiere it’s 1 second by default, but that’s sometimes a bit tight when you’re mixing and want to adjust a fade-in or cross-fade.
Besides an OMF (or separate audio files), you also want to export a reference video, so you can import it into the audio editor. Most DAW’s can handle a small MP4 with H264 codec. Keep it small so the DAW doesn’t have to waste all it’s resources on the video.
Importing OMF files into your DAW
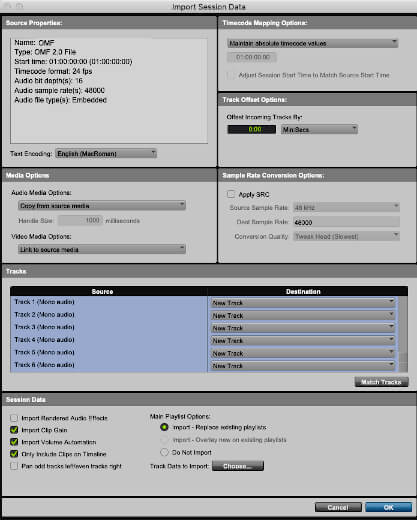
How do you import an OMF into your DAW? That differs per DAW, but most of the time it’s not very difficult. In Pro Tools for example, you first create a session. Then you go to File – Import Session Data and select your OMF file. Other DAW’s have similar ways of importing OMF files, start looking at File- Import.
Usually there are many options you can choose from when importing an OMF file, see the screen below. This is the import window you see when importing OMF files into Pro Tools. But don’t get intimidated: Most of the times you can leave all the settings as they are and simply click ‘OK’.

That’s it, do you have any questions or comments? Please send an email to gijs@audiokickstart.com.

