Stereo microphone techniques
As discussed here, each microphone has its own sound. When you have more recording experience, you get to know the sound of different microphones. And that way you know exactly which one to pick when you are recording a slightly dull sounding acoustic guitar. Or on a voice that is a little bright.

To help you get started, AudioKickstart.com will soon have a tutorial on how to record specific instreuments and which microphone is best for the job. There we will also look at how to set it up for that instrument.
But some instruments are usually recorded in stereo. A piano, for example. Or an acoustic guitar. And for that you have the choice between differnet stereo microphone techniques. Here we will discuss the most common ones.
AB stereo recording technique and the 3:1 rule
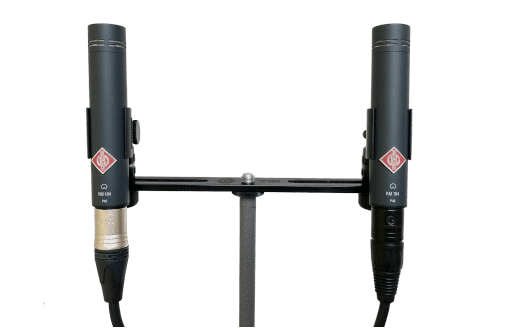
The AB technique uses two microphones in parallel, both with a cardioid polar pattern. Use the same mic twice (same type, same brand. This applies to almost all stereo microphone techniques except the MS technique, see below). Otherwise it can sound unnatural because the left mic may sound very different in terms of timbre from the right mic. An important factor to take into account when recording in stereo, is phase. As you can read in the audio theory tutorial, sound reflections will arrive at the two mics at slightly different times. This creates phase differences. Basically, this is wat makes something sound stereo. But the phase differences can also make your recording sound very different (i.e. not good).
To avoid this, audio schools and books usually advise to use the so-called ‘3:1’ rule: If the distance between the instrument and the microphone is 60cm, the distance between that microphones and a second mic should be 3x as much, so 180cm. This is supposed to prevent many phase problems. But the 3:1 rule doesn’t do much for phase problems in my opinion. It is suited to prevent crosstalk when recording multiple instruments, however. If you record two different instruments side by side, then the 3:1 rule ensures that the microphone pointed at one instrument does not pick up too much of the other instrument. But if you are recording the same instrument with two mics using the AB stereo microphone technique, you can ignore this rule. Or at best use it as a sort of ‘starting point’: position the microphones so that they comply with the 3:1 rule, and then start listening and moving the mics around to see if breaking this rule produces a better sound.
The sound of the AB technique is open and wide, but the definition and localization of the sound is less sharp compared to other stereo microphone techniques.
XY stereo recording technique
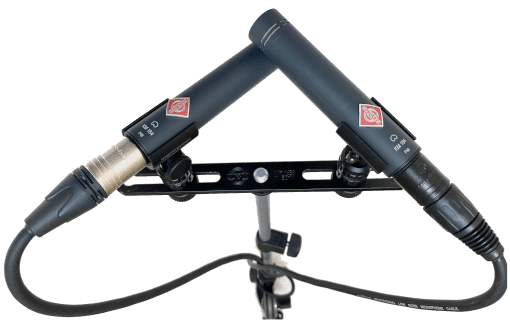
This technique uses two identical cardioid microphones placed above each other, at an angle of about 90 degrees (see image).
Experiment a little with this angle, sometimes something like 120 degrees works better with certain microphones. Because the two microphones are coinciding, the sound will arrive at both mics at the same time. This means you have less phase differences. The result is a sound that is not as ‘spacy’ as the sound you get from the AB technique, for example, but you also run into fewer phase problems when recording.
The sound of this technique is not extremely wide, but it is clear and defined and you can locate the sound well in the stereo image.
ORTF stereo recording technique
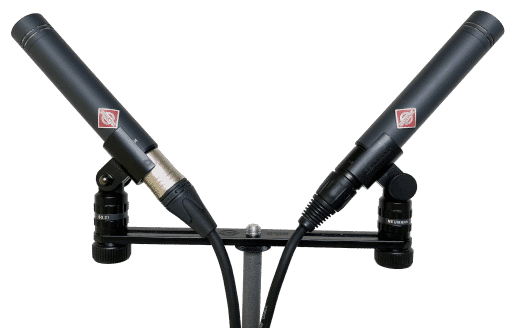
The ORTF technique was invented by the French Broadcasting Corporation (Office de Radiodiffusion & Television Francaise). It is sort of a combination of the XY and AB technique.
Two microphones with a Cardioid polar pattern are aimed at the instrument with an angle of 110 degrees and at a distance of 17 centimeters from each other. And yes, 115,8 degrees and 15,45 centimeters will probably also sound fine. 😉
I like the sound of this technique, for example on acoustic guitar. You have a nice and wide stereo image, but at the same time a good definition in the sound.
MS (Mid-Side) stereo recording technique
This technique is a little more ‘technical’ to set up. It is actually not even a real stereo microphone technique. We use a trick during mixing to make the recording sound stereo instead of actually recording in stereo.
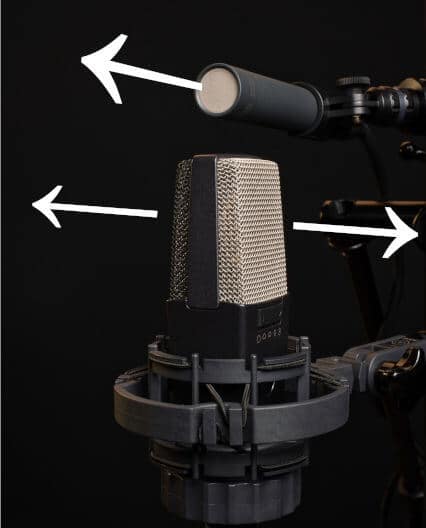
The technique uses two microphones placed one above the other. A cardioid microphone aimed directly at the instrument (top microphone in the picture below), and below that a microphone with a figure-8 pickup pattern that is picking up sounds coming from the left and right (bottom microphone in the picture). Of course, for this you need a microphone that you can switch to a figure-8 directional sensitivity. See this tutorial if you want to know all about pickup patterns.
When using this technique, the two mics do not necessarily have to be exactly the same brand / type, as long as one has a cardioid sensitivity and the other one a figure-8 sensitivity.
Now the cardioid mic picks up a lot of sound coming directly from the instrument, while the figure-8 mic picks up more of the reflections and the space you are recording in.
Ok, in the mix we are going to make sure that the microphones together give a wide stereo image. We do this as follows:
- Put the track with the cardioid microphone (upper mic) on channel 1. Make sure the panning of the microphone is in the middle.
- Put the recording of the figure-8 microphone recording (bottom mic) on channel 2 and pan this channel hard left.
- Duplicate this channel to channel 3 and pan this channel hard right. Make sure the audio on the track does not move: it should be on exactly the same place on channel 2 and 3.
- Now make sure you reverse the phase of channel 3 in your audio software. In the ‘effects’ menu of most audio software you will find an option to do this. Sometimes the option is called ‘Invert’, sometimes ‘Phase Reverse’. Sometimes you can also control it per channel on the mixer of your DAW. Or via a plug-in. Look for a button with a “Ø” sign: with this you reverse the phase 180 degrees.
- Phase is a weird and wonderful phenomenon. To illustrate this: put channel 1 on mute and pan channel 2 and 3 both to the middle after you have reversed the phase of channel 3. You will notice that the sound is now (almost) completely gone. This is because channel 2 and 3 now cancel each other out. To understand this, read this piece. This will make you understand this microphone technique a little better anyway! 🙂
- Make sure that the level of channel 2 and 3 remain the same. So if you increase the level of channel 3, make sure you increase the level of channel 4 by the same amount. Link/group the channels in your audio software to keep things simple, that way you can just control the level of both channels with 1 fader.
- Find a nice balance between channel 1 (the cardioid microphone, the direct sound) and channel 2 + 3 (the figure-8 microphone, the indirect sound). By playing with the volume of those channels you have a lot of control over how wide the sound is going to be. The softer you set channel 2 + 3 in relation to channel 1, the more mono the sound will be. And vice versa. But there will always have to be a balance between all three channels for an ‘even’ sound. If you don’t use channel 1, the sound can cancel out completely when listening to it in mono (both channels in the middle), as we saw above.
Combinations
Besides these four basic techniques, there are all kinds of combinations. The Blumlein technique is the same as the XY technique, but with microphones with a figure-8 sensitivity. This allows you to record more of the room and gives you a more spacious sound.
The ‘Faukner configuration’ uses a kind of AB technique (two microphones in parallel), but at a distance of 20 centimeters from each other and the sensitivity of the microphone is also set to figure-8.
Any question or comments? Mail me at gijs@audiokickstart.com!

